
Getting started with Time bot for Slack
Welcome to Time bot! This page is your guide to getting started with our time management tool. With Time bot, you'll be able to track your time easily and efficiently, so you can focus on what matters most. Whether you're a freelancer, a small business owner, or just looking to be more productive, Time bot has got you covered. Get started today and start getting things done!
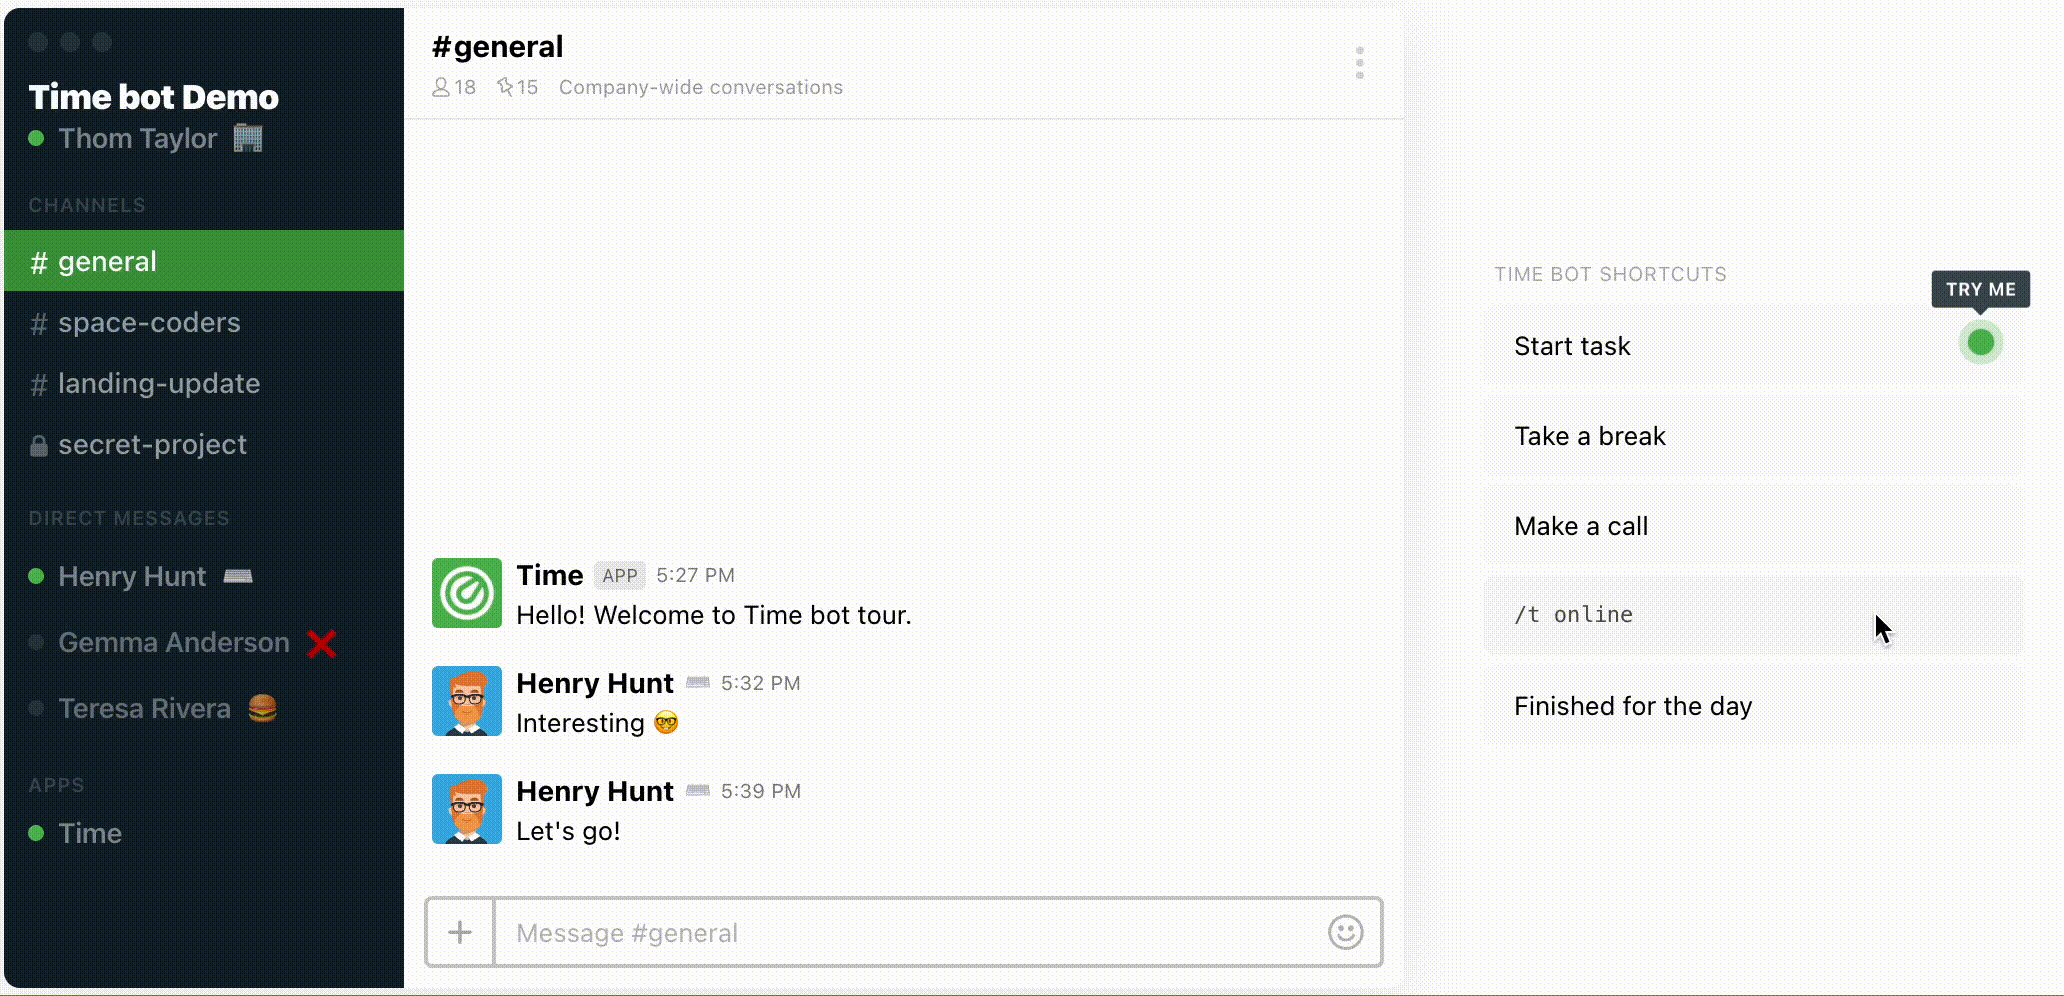
Feel free to add Time bot to your Slack workspace from Slack apps directory.
Time Bot for Slack Commands
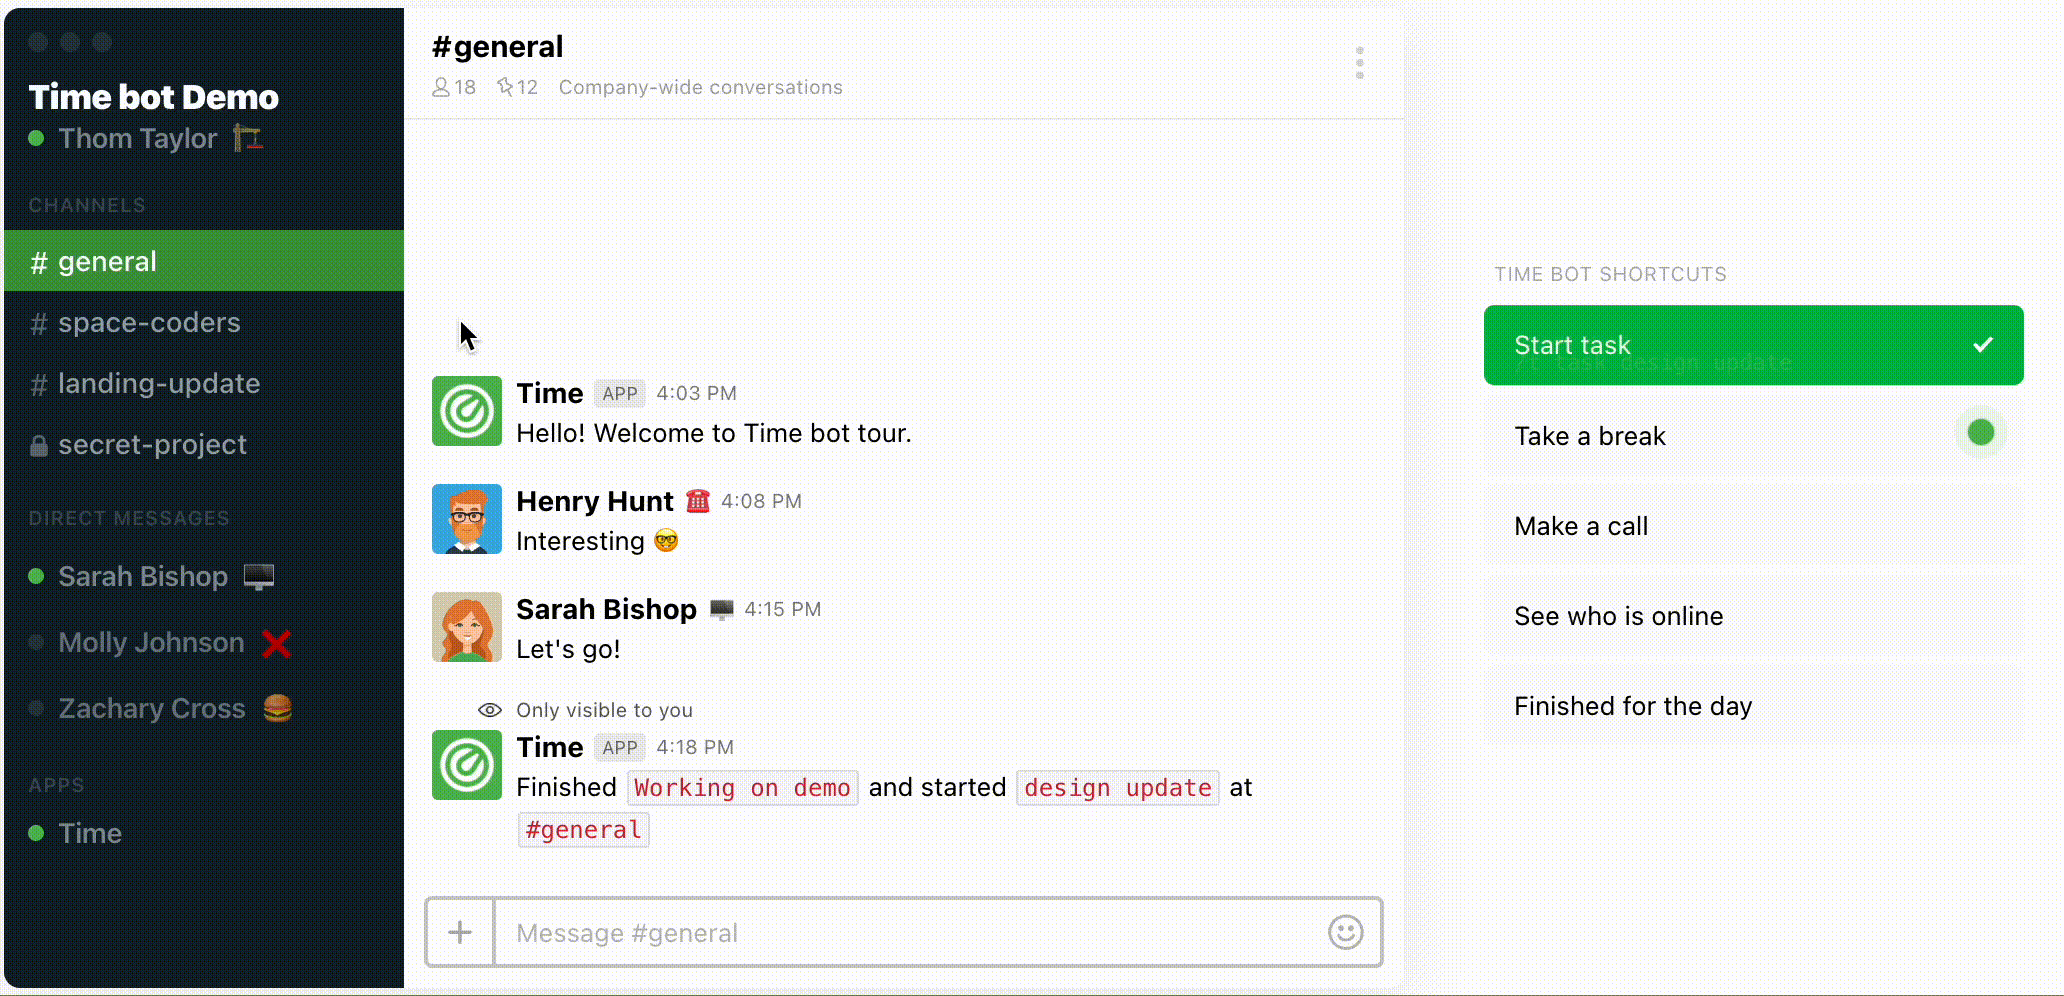
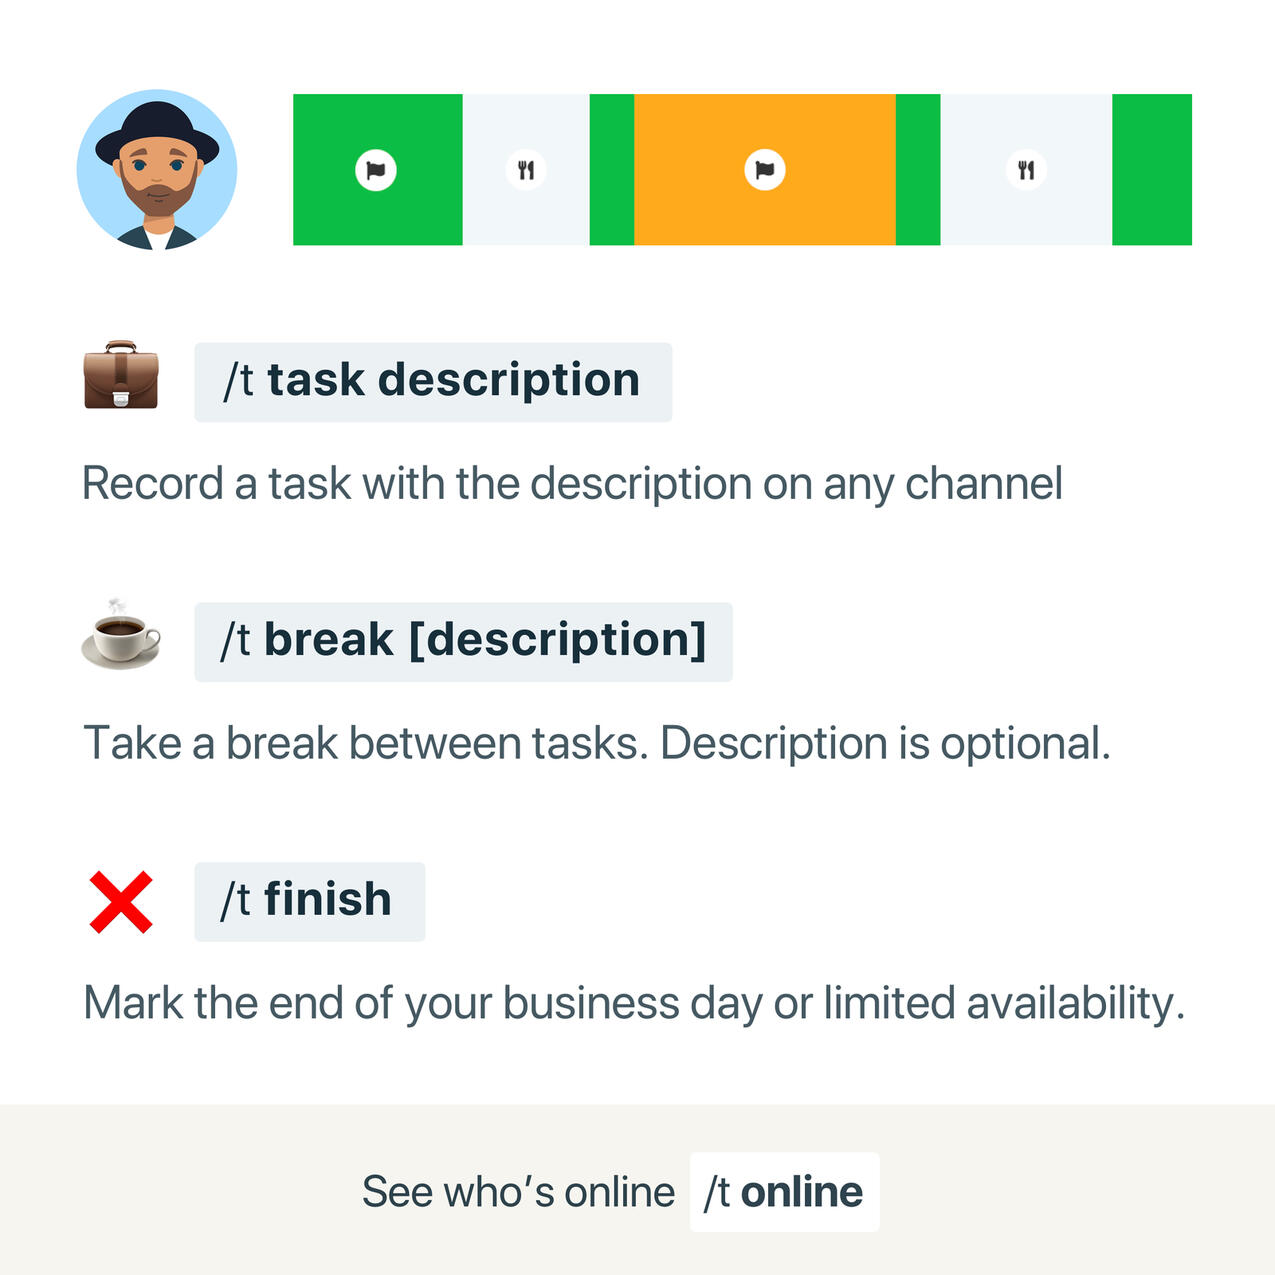
/t task description — start time-tracking for the task.
/t break description — track a break with custom description.
/t break — track a break between tasks.
/t call — when on call or meeting.
/t finish — finished for today. Indicates limited availability.
/t online — check who's online now including timezone.
/t help — available commands.
/t status — (admins only) current team statuses and time spent on them.Shortcuts/t b — track a break between tasks.
/t f — finished for today. Indicates limited availability.
Take a detailed look at how to use the commands above:
/t task description
Starting your workday is easy with our Time app! Simply type /t followed by the task description in the app or channel where you're working, and you're good to go. Our app makes it simple to keep track of your tasks and stay organized throughout the day.
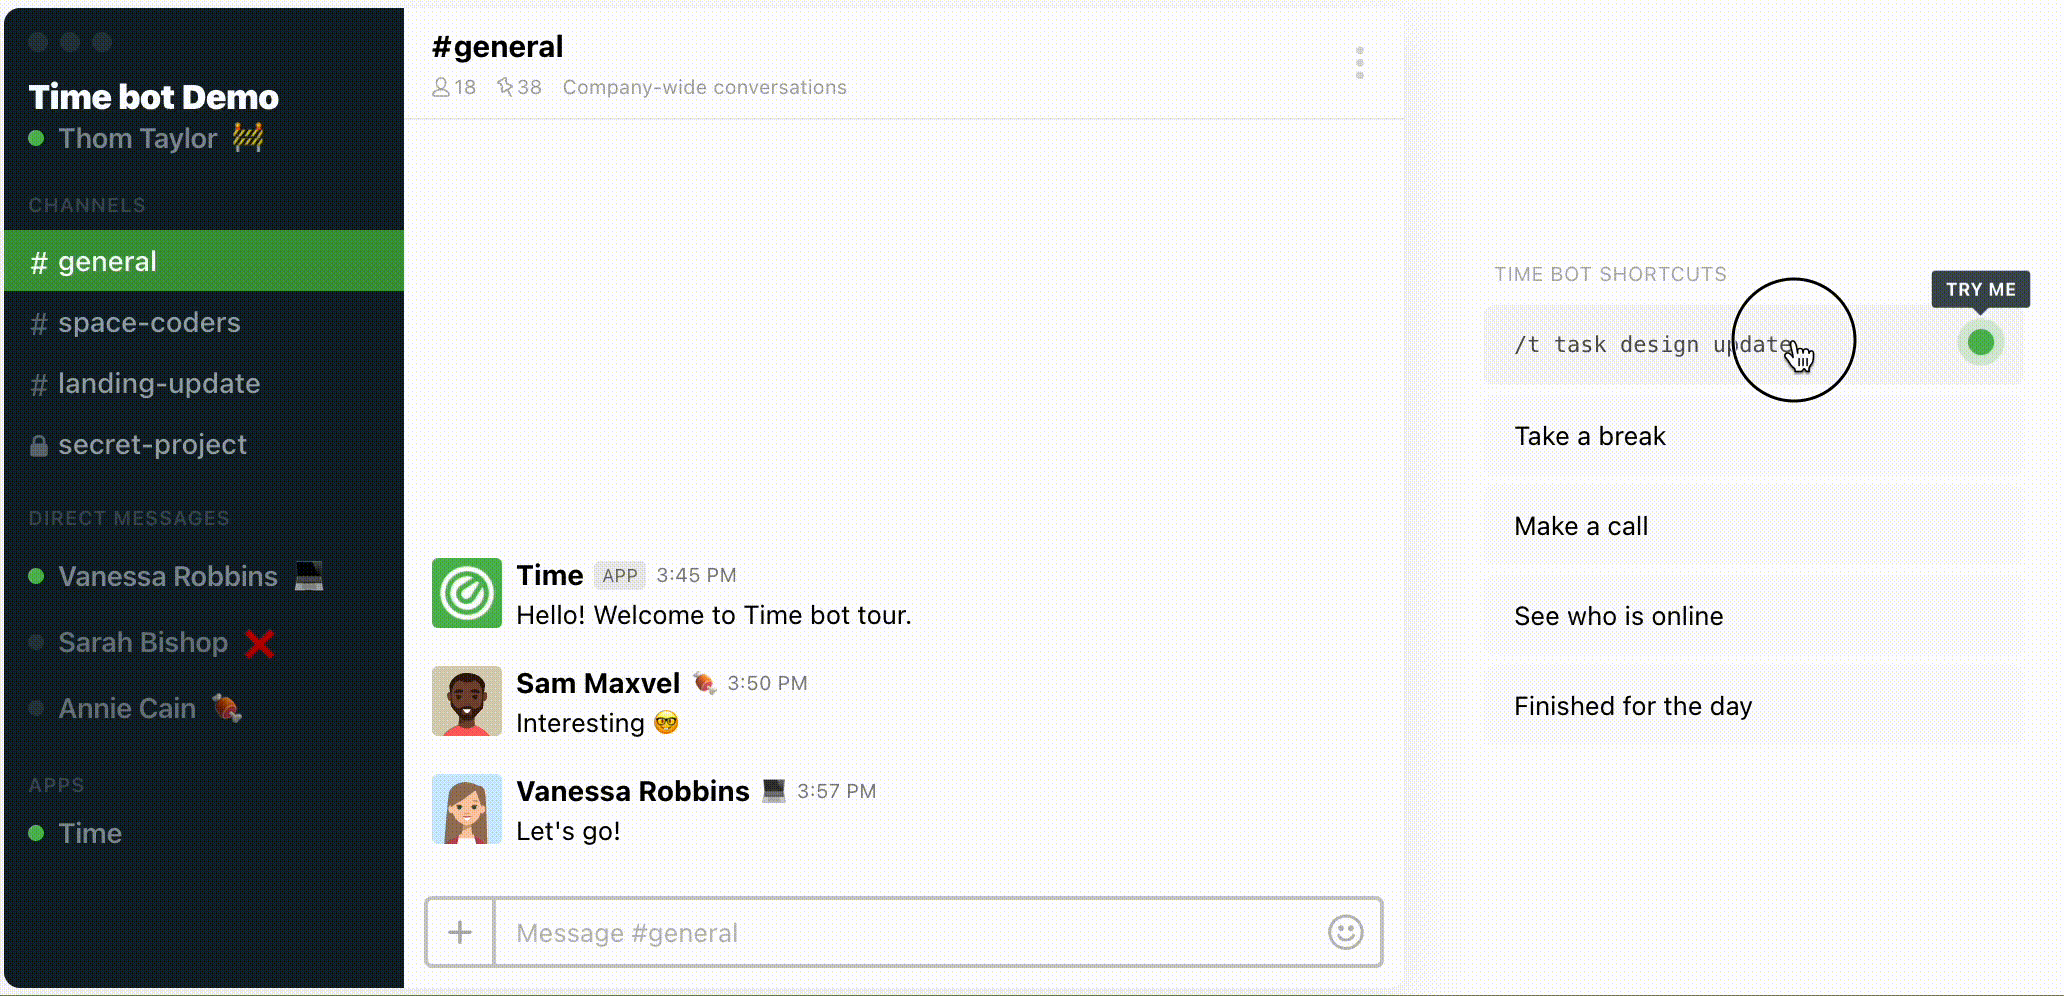
To seamlessly switch to a new task, navigate to the relevant channel and enter /t followed by a brief description of the new task. This will automatically conclude your previous task and initiate the new one, ensuring a smooth transition between tasks.
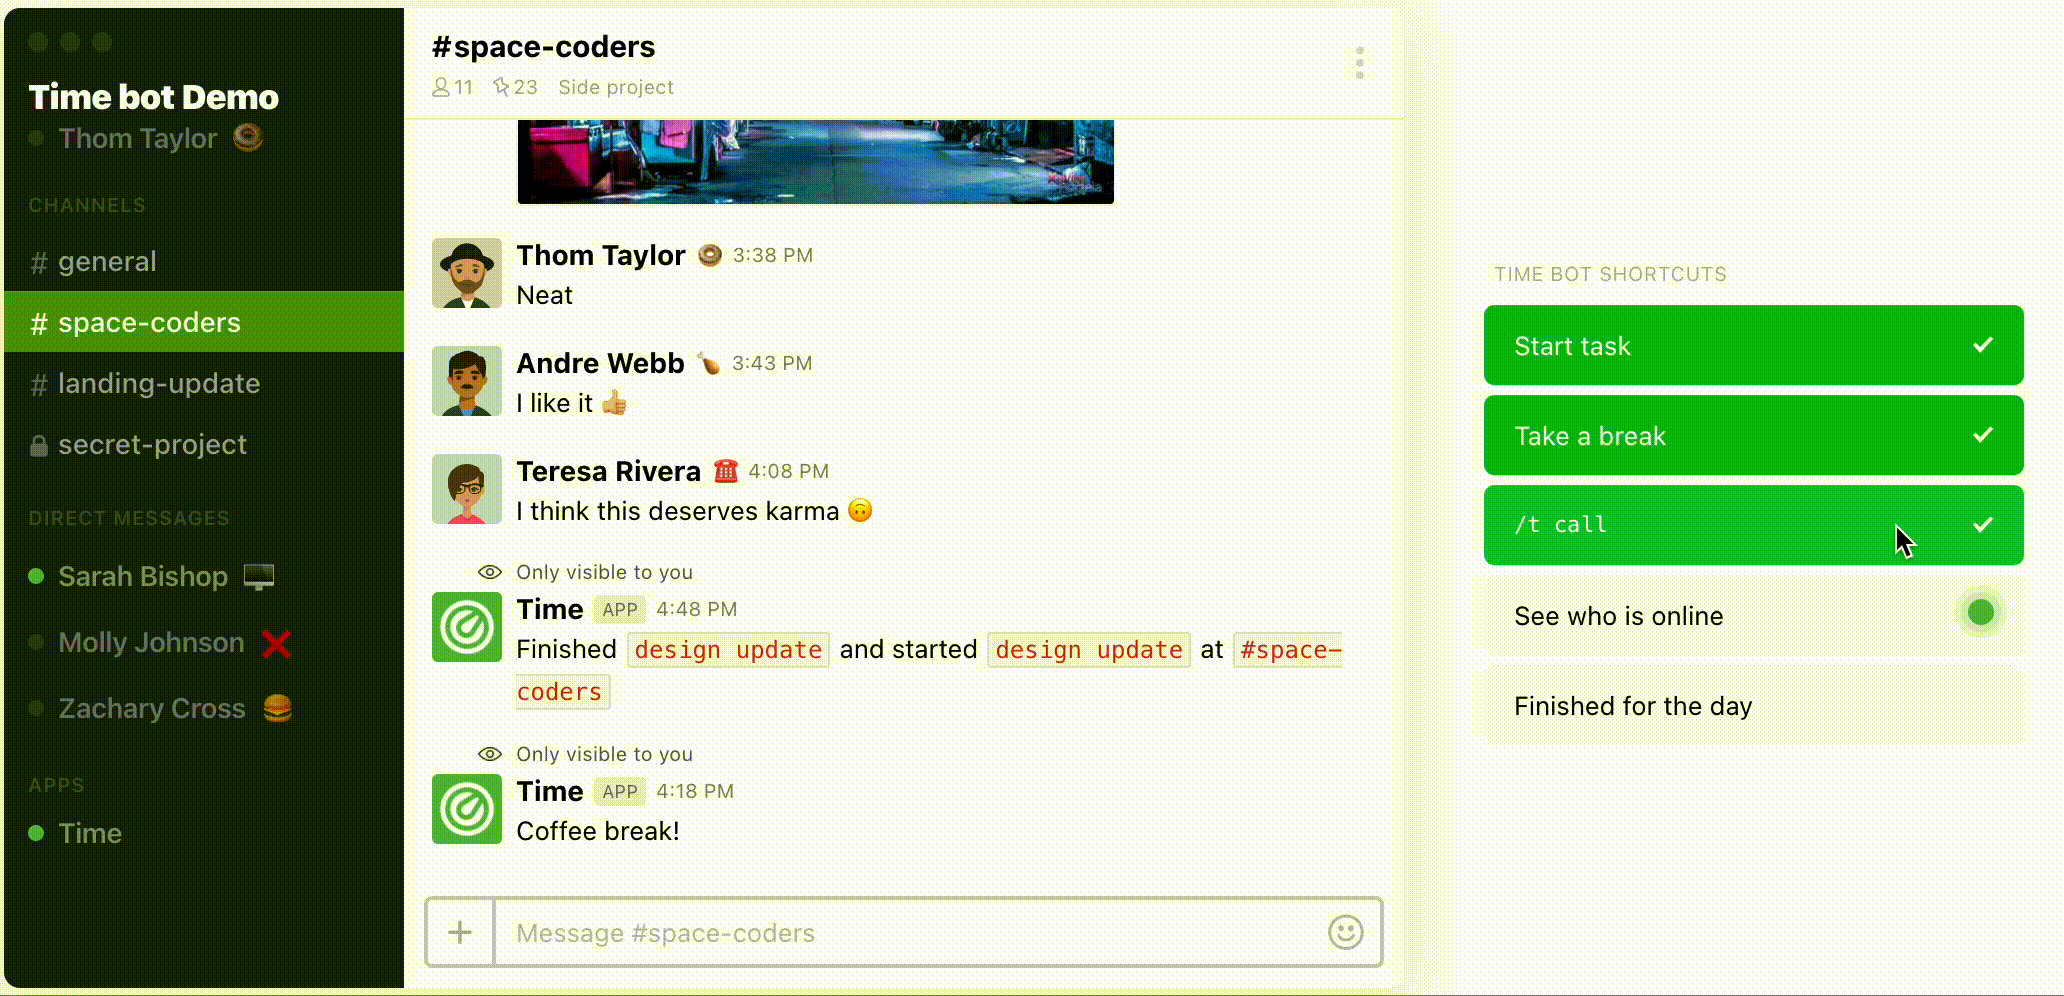
/t break
To take a break between tasks, you can enter any of the following commands in any channel:
/t break [description]— if you want to specify the length of a break, for example, you can type/t break lunch./t breakor/t b— if you want the take a short coffee break.

To resume working after taking a break, you can either continue with the previous task or switch to the next one by typing /t followed by the task description in the corresponding channel.
/t call
To indicate that you are on a call or in a meeting, you can use the command /t call in any channel or on the Time app.
/t help
If you ever forget any of the necessary commands, you can always type /t help to access a list of quick actions.
/t online
To view the list of colleagues who are currently online and their respective time zones, simply type /t online in any channel or the Time app.
/t finish
Let your colleagues know that you are done with work for the day by typing the /t finish or a simple shortcut /t f in any available channel.
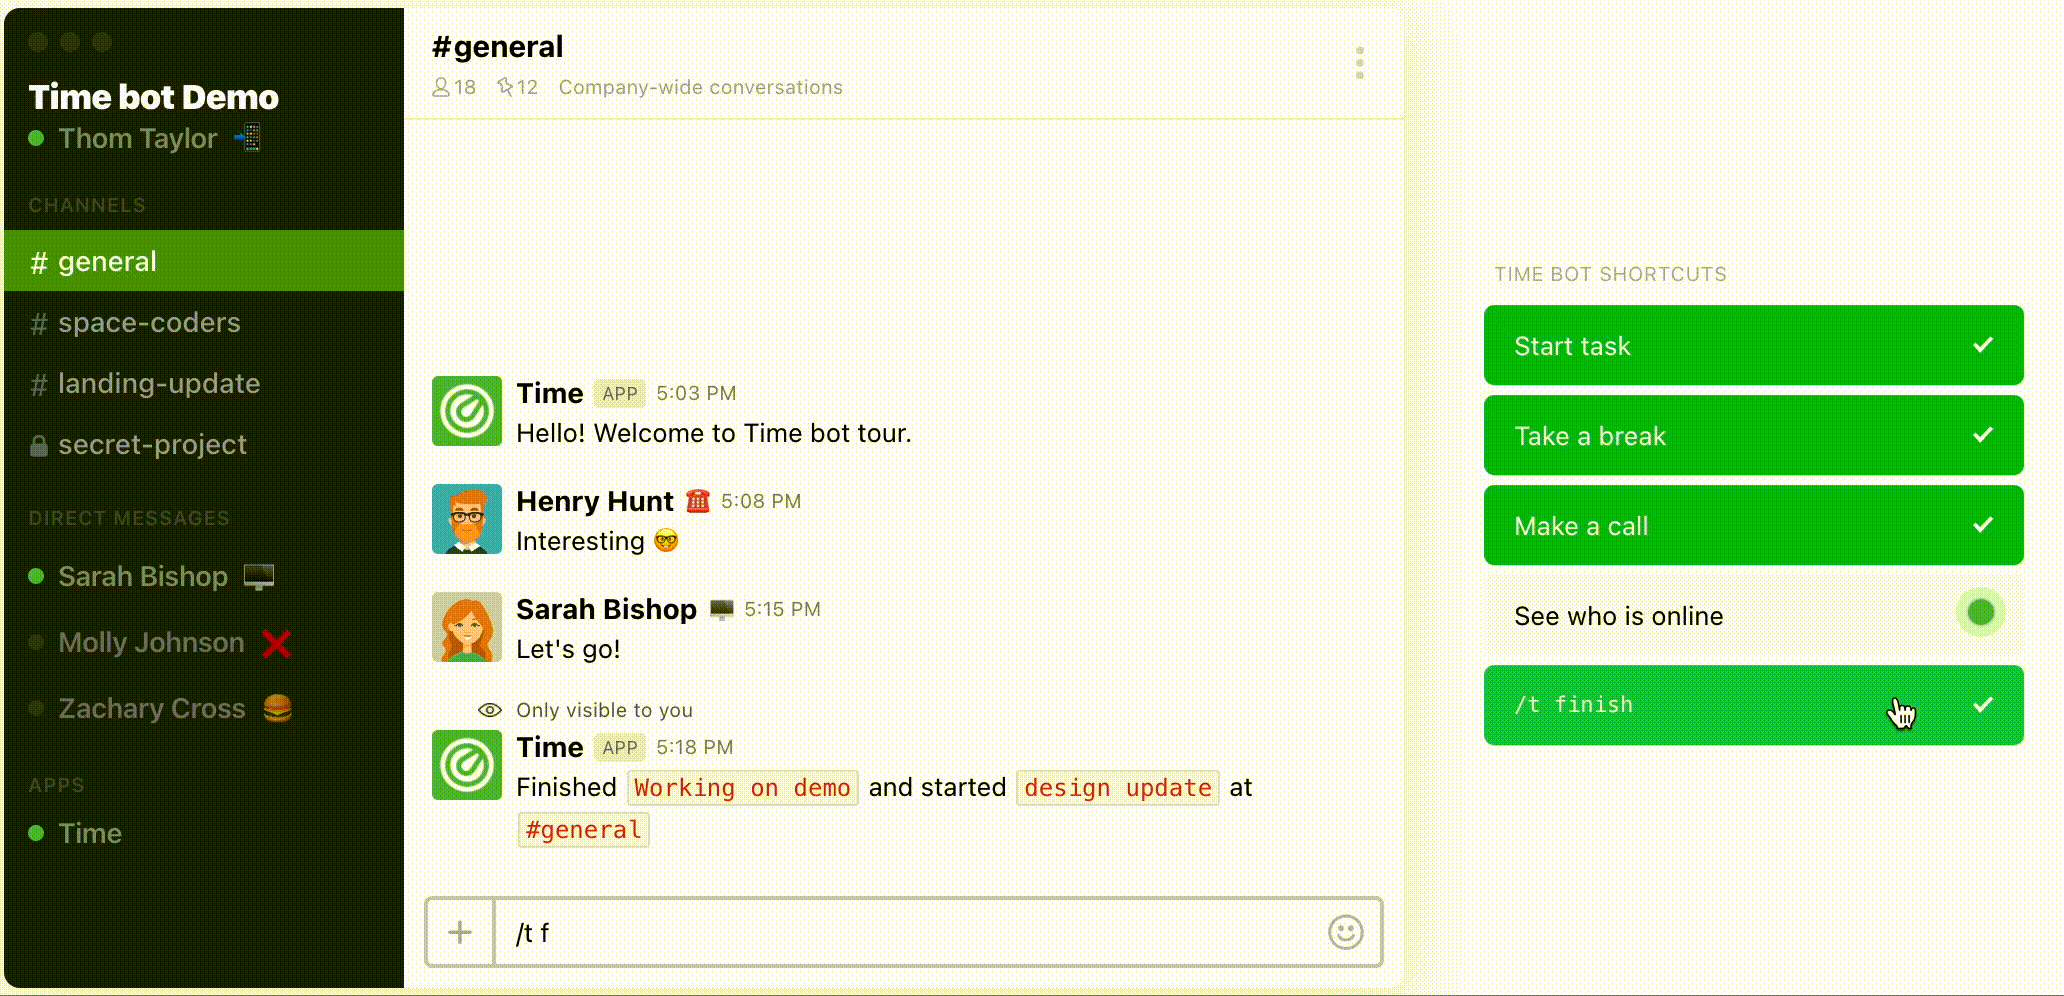
The red cross next to your username will indicate limited availability.

💡 Pro tip: You can also use the Time playground yourself. This tool can provide additional insight and opportunities for experimentation with Time bot's capabilities.
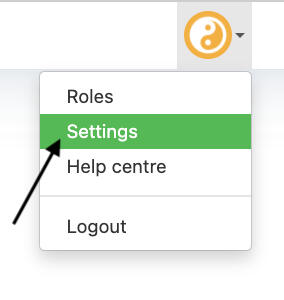
Settings
To access the Settings in your Time Bot account, simply click on your Profile menu located on the top right of the tab bar. From the dropdown that appears, select "Settings."
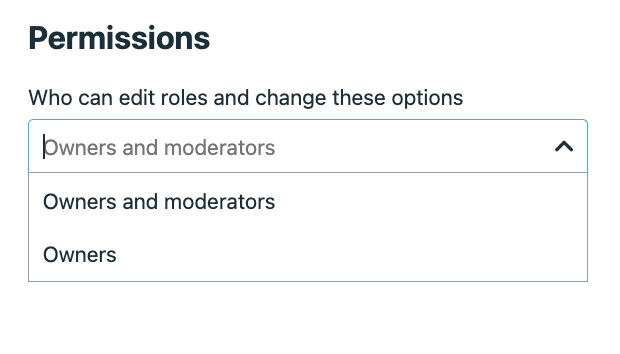
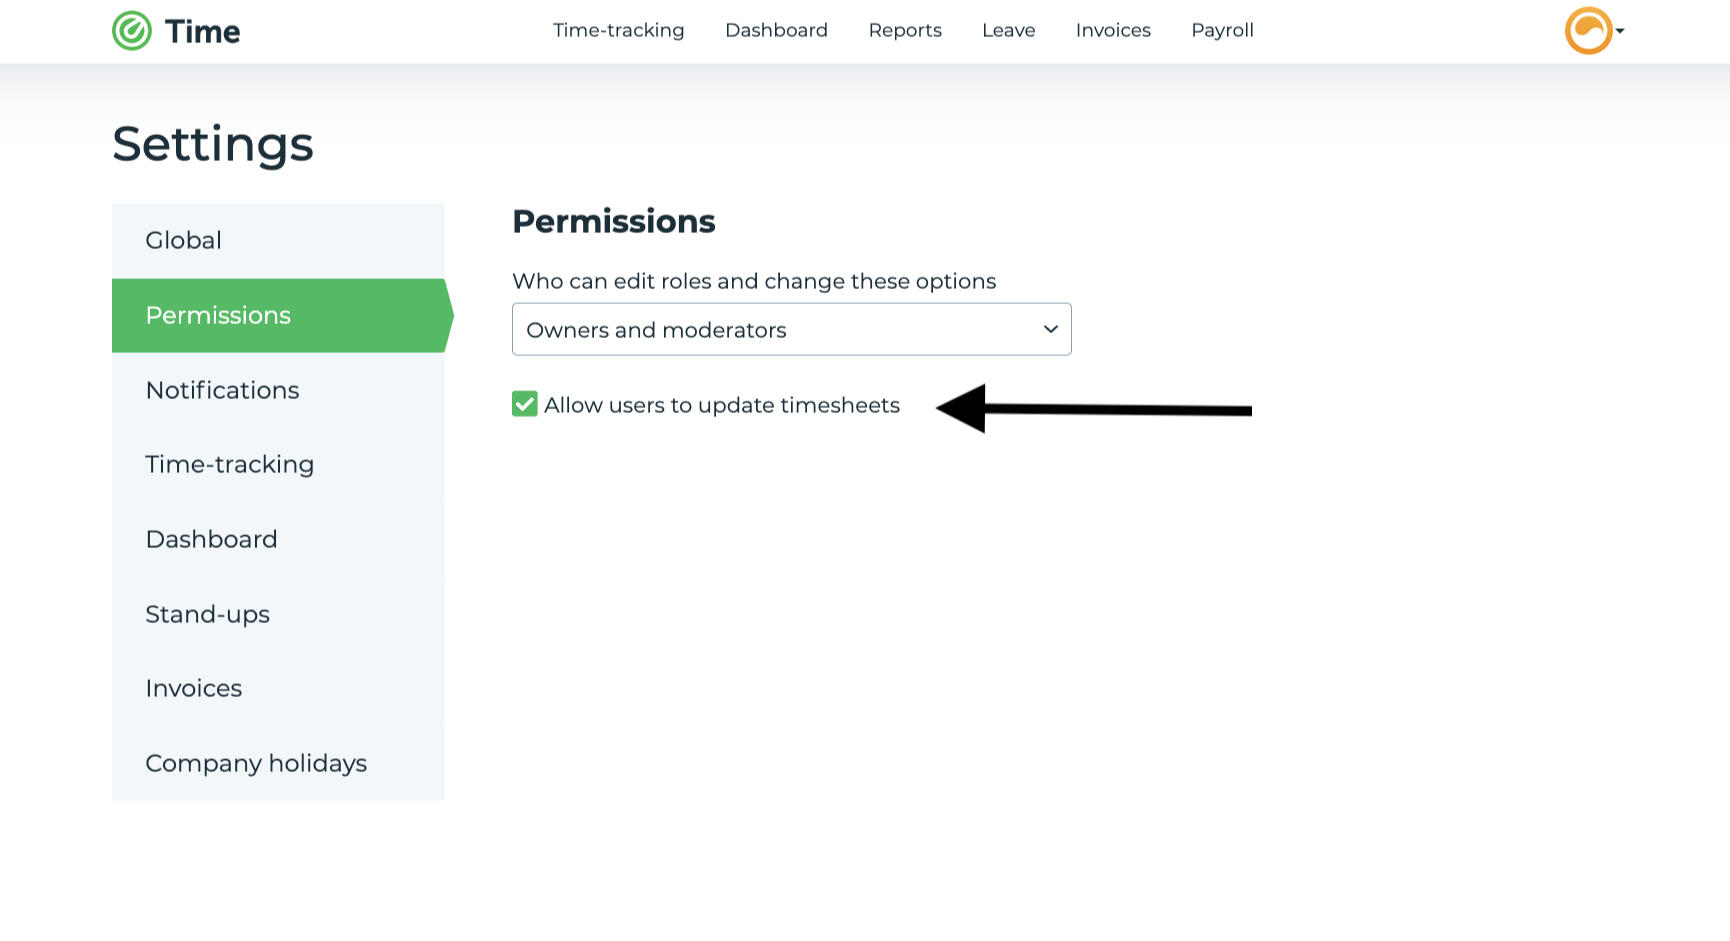
Permissions
In the Permission tab, you can specify who has access to edit roles and change permissions for the available options. To assign access, choose one of the options from the dropdown menu.
To grant users the ability to adjust the duration of both tasks and breaks, just select the checkbox below.
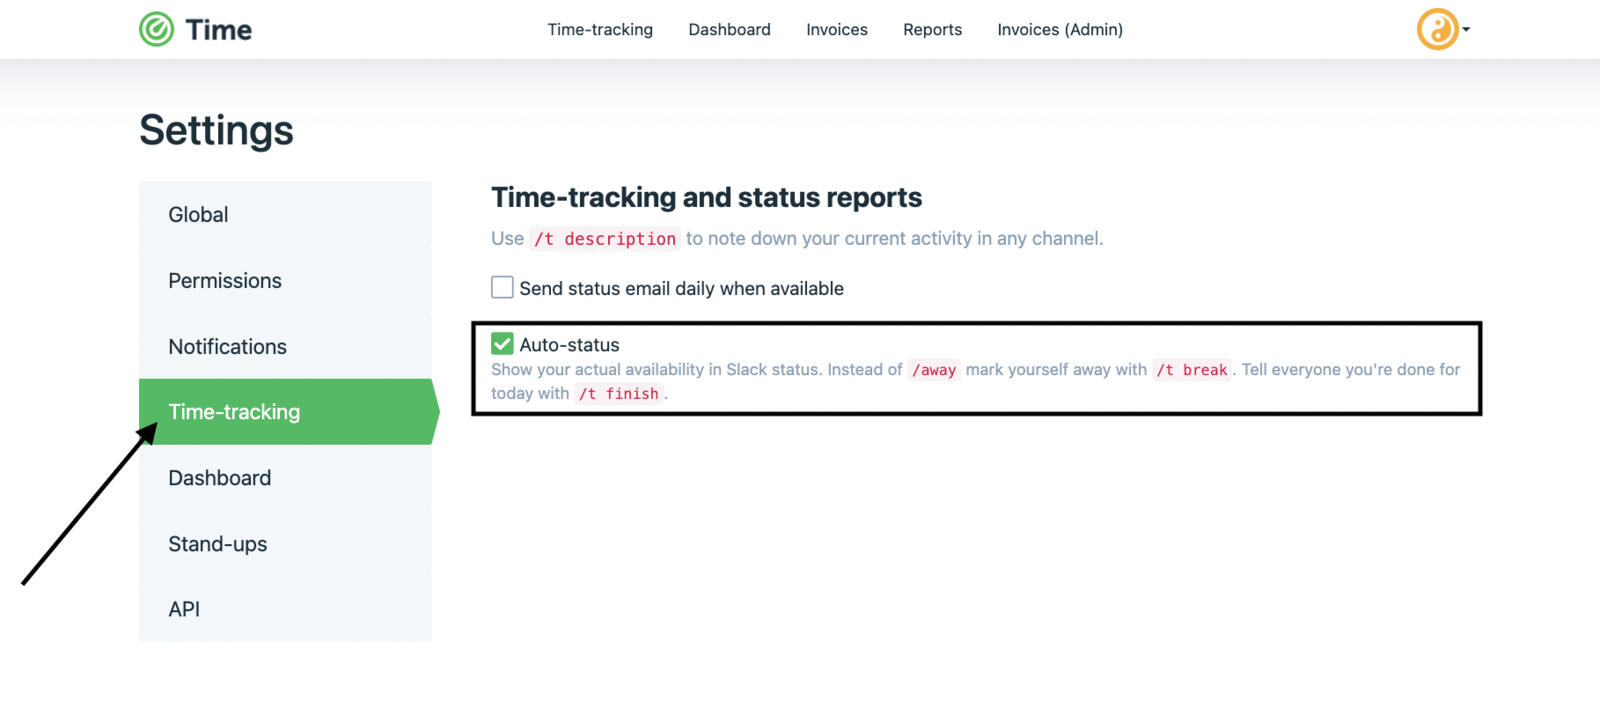
Time-tracking
In this section, you have the option to schedule daily status reports and sync your activity with the status in Slack. This helps you stay organized and keep track of your progress effortlessly.
To schedule daily status reports, follow these steps:1. Select the checkbox for sending daily reports.
2. List all the emails that will receive the reports separated by commas.
3. Set the preferred time for sending the daily status reports.

To synchronize your activity with the status in Slack, simply check this checkbox below.
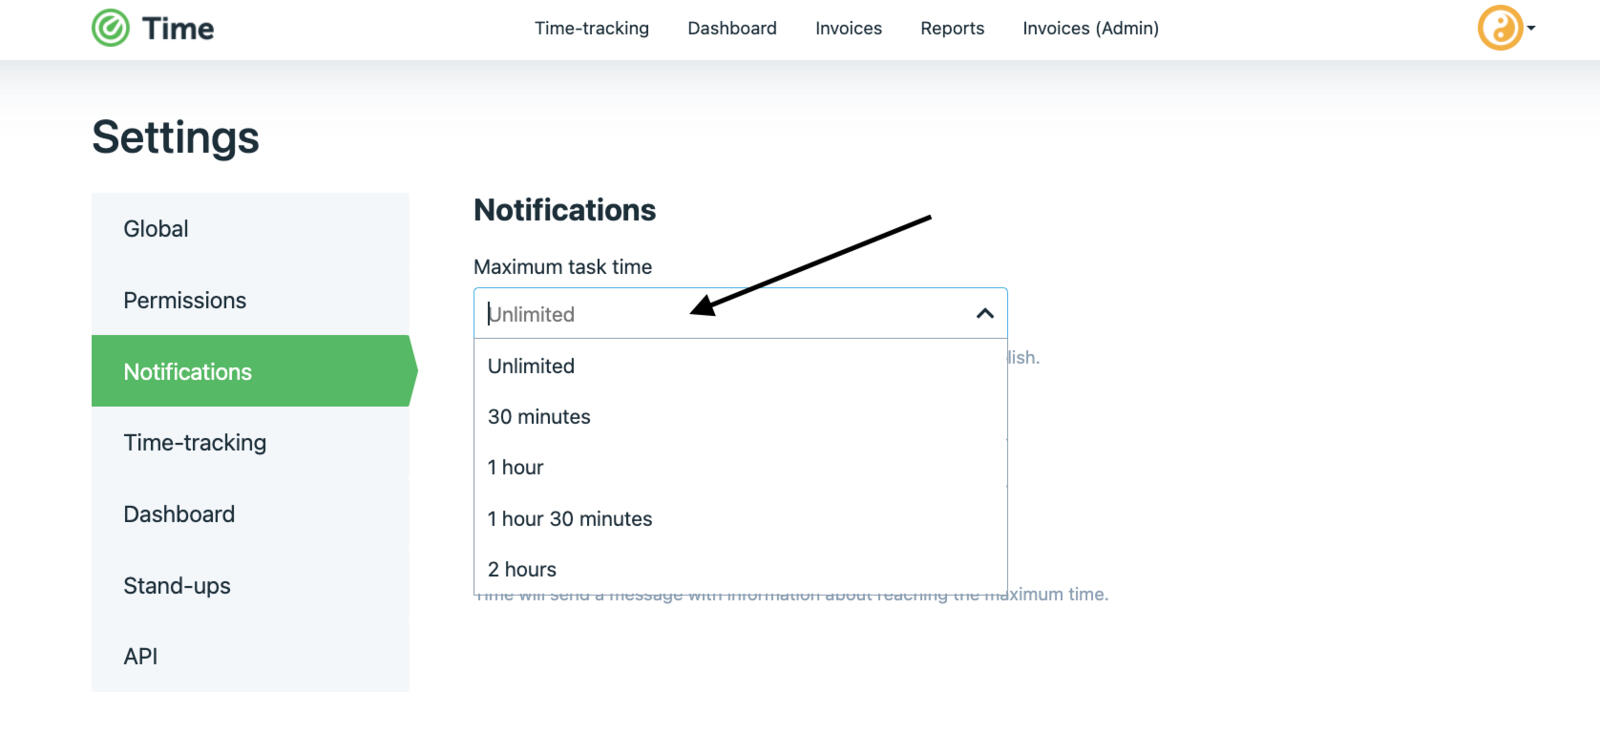
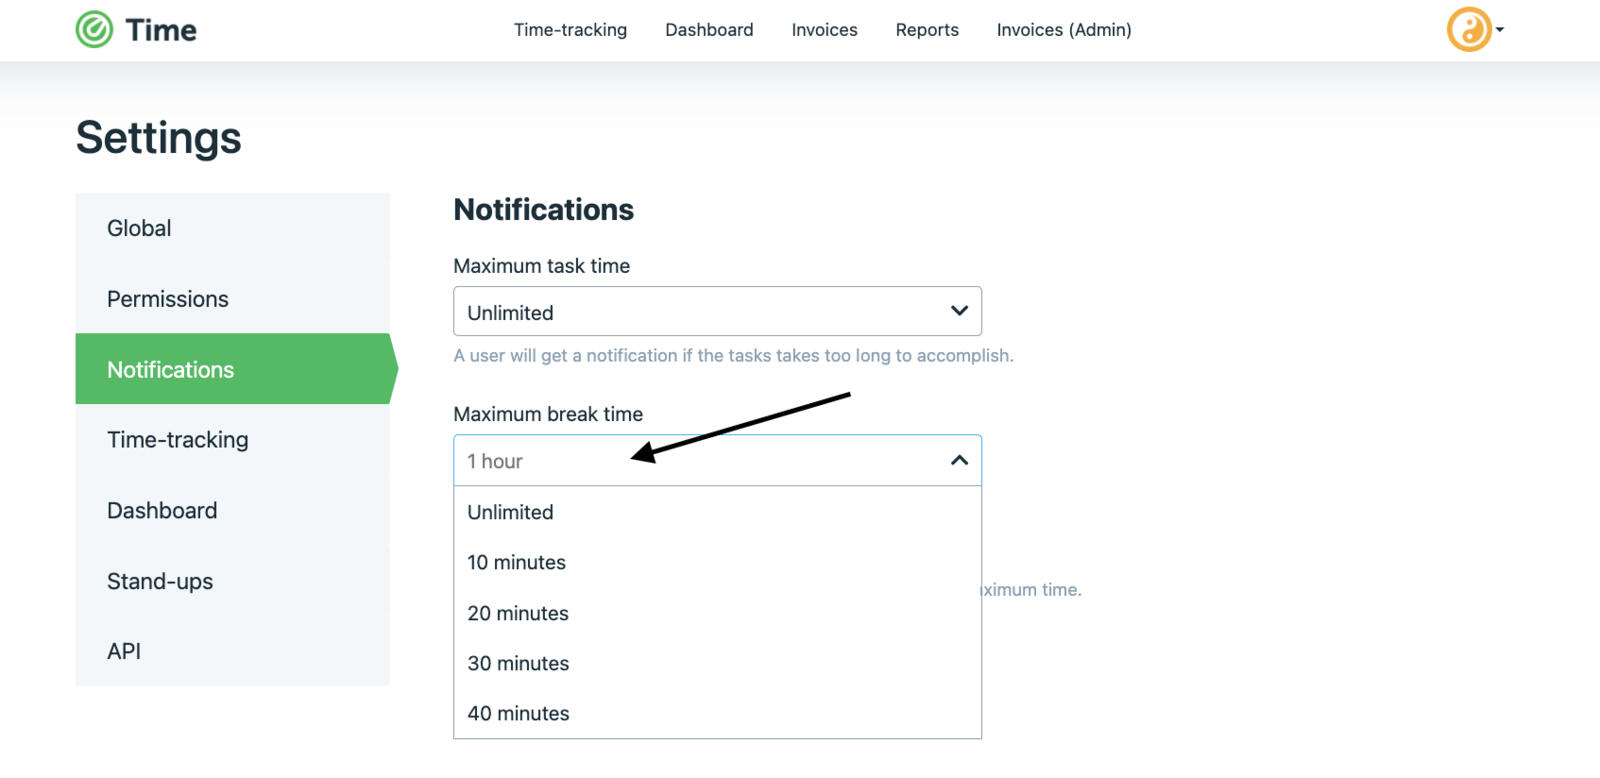
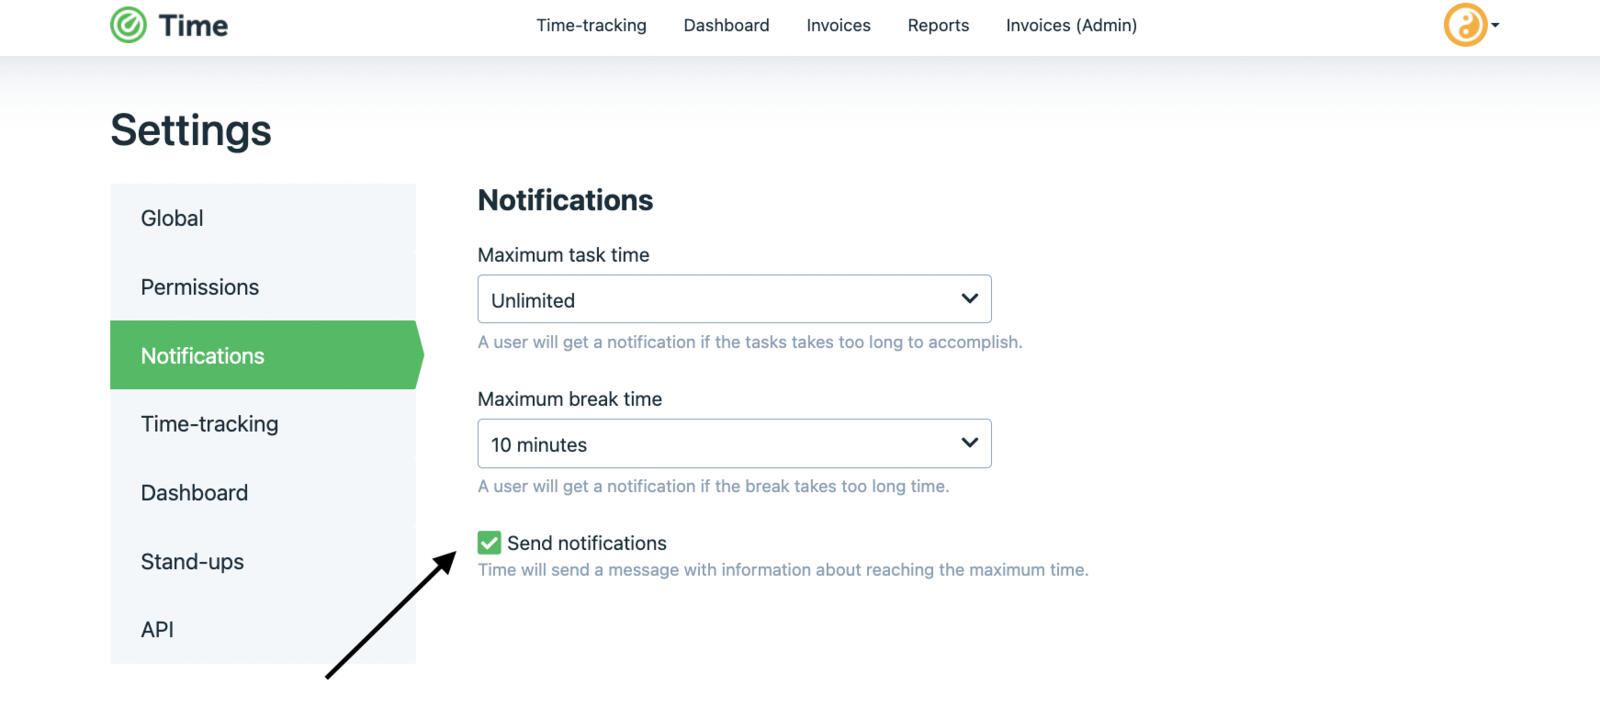
Notifications
Set the maximum task/break time and configure notification preferences.
Choose task time from 30 minutes up to unlimited.
Choose break time from 10 minutes up to unlimited.
To enable notifications for your employees when they reach the maximum task or break time, select the 'Send notifications' checkbox.
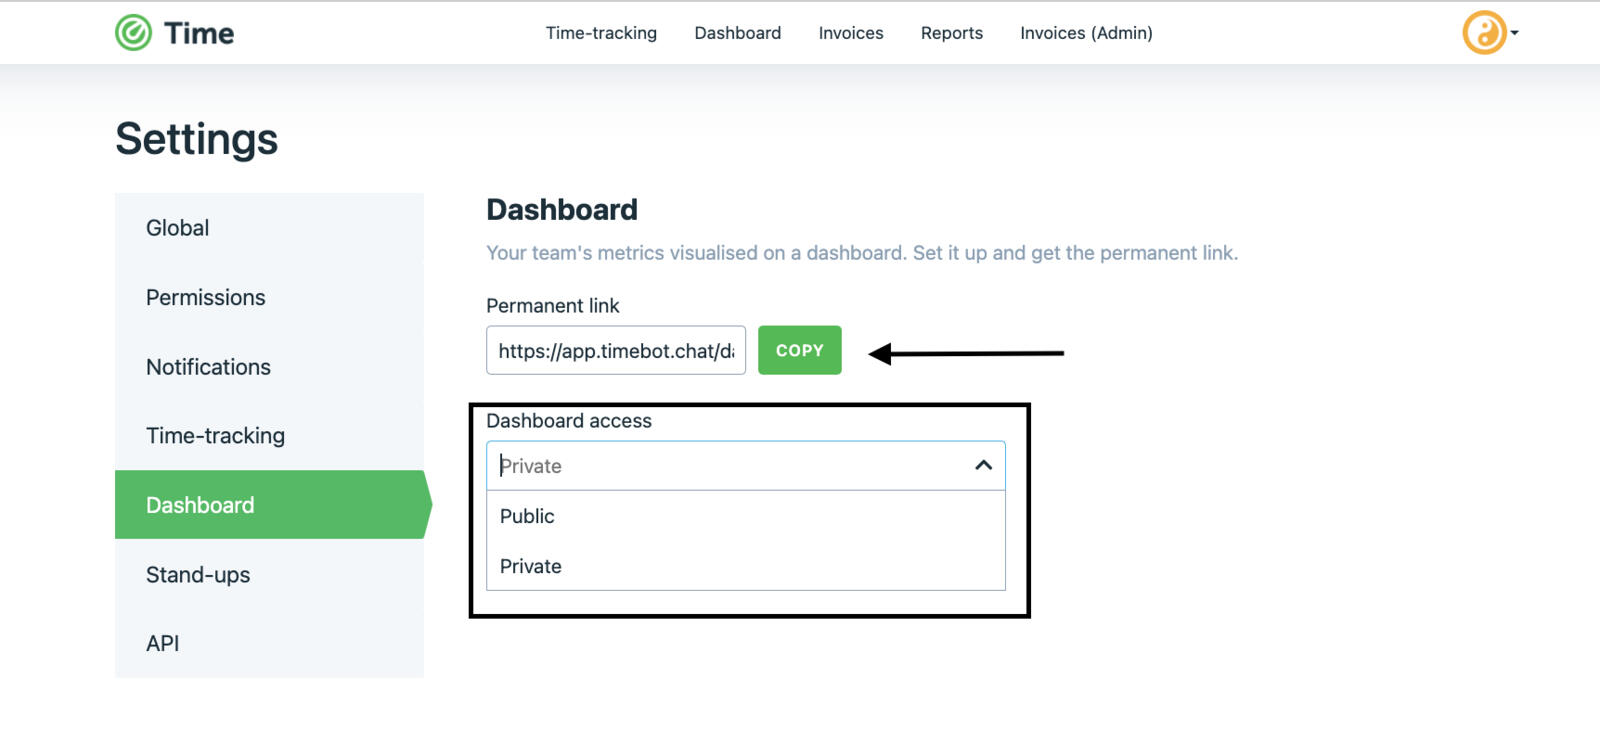
Dashboard
Set up the access for the dashboard and obtain a permanent link.
Choose the preferred type of access by selecting it from the dropdown menu:
Public access if you`re willing to share the link with anyone outside of your team.
Private access and only logged-in users from your team will be able to see the Dashboard.
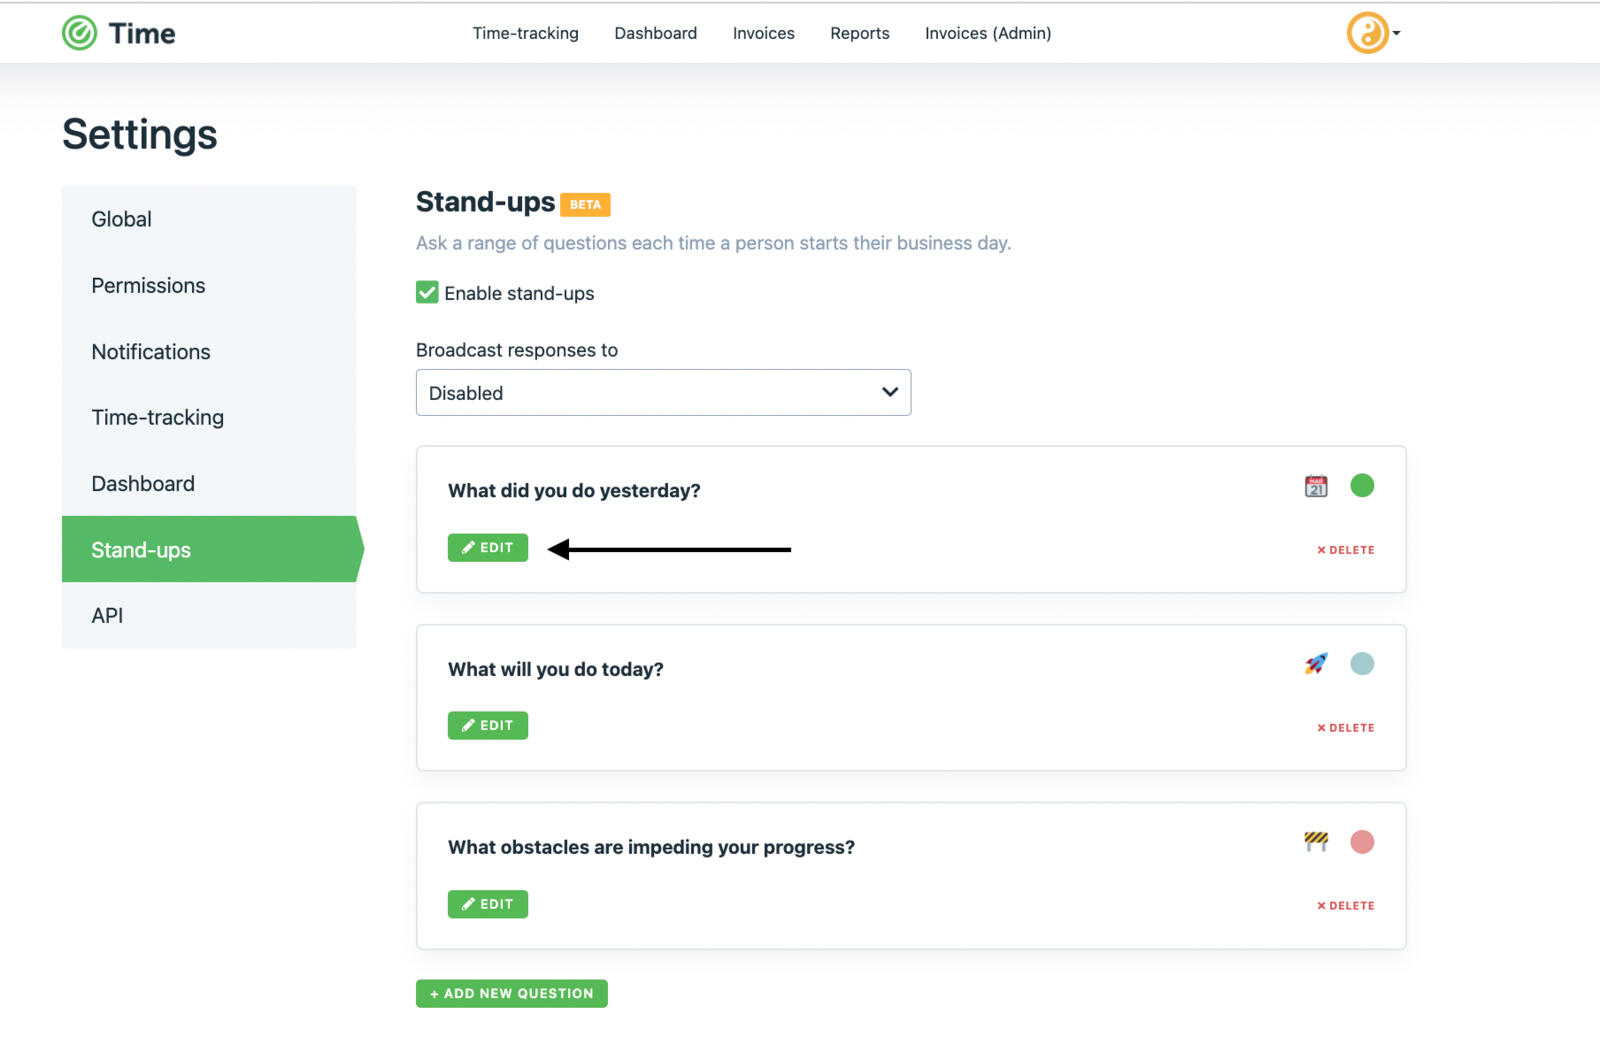
Stand-ups
Customize questions for daily stand-up meetings to track the team's productivity.
To set up the daily questions, make sure to enable stand-ups by checking the checkbox.
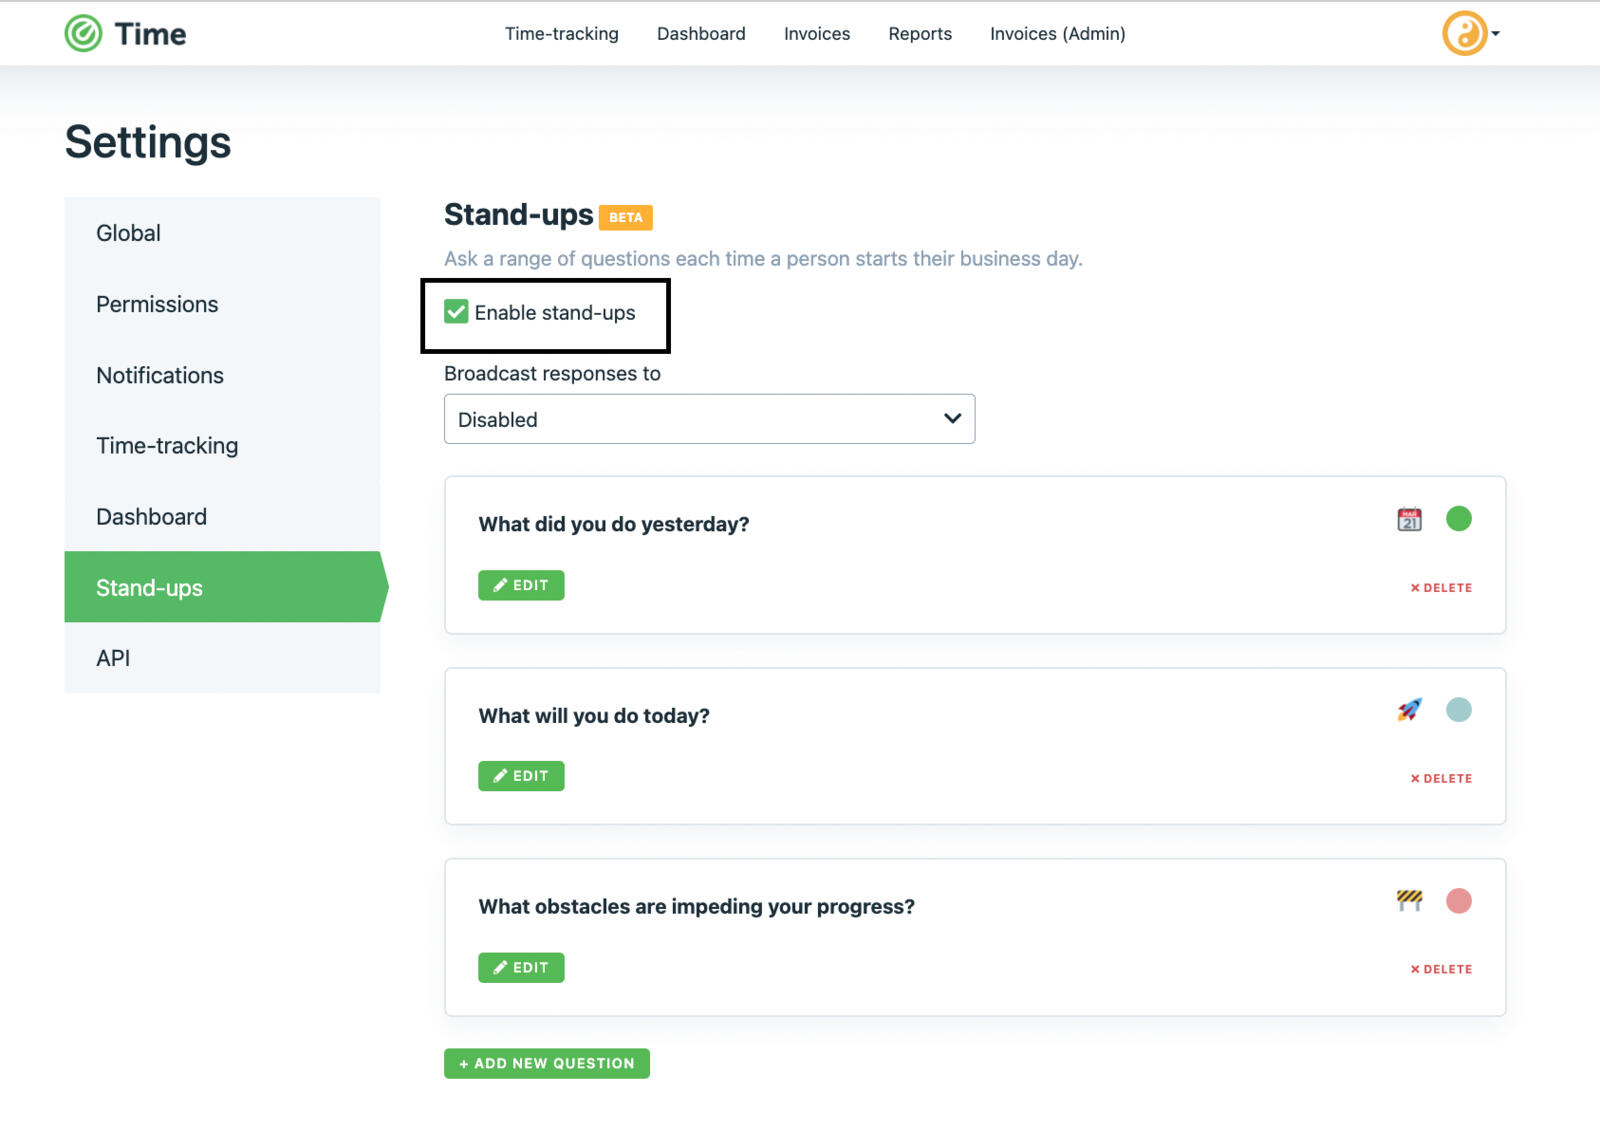
Choose the channel for broadcasting the stand-up meetings.

Typically, daily stand-up meetings involve asking each member a few key questions at the start of the day. However, you have the flexibility to add new questions or edit the default ones. The standard questions may be as follows:
What have you finished since yesterday?
What will you do today?
Any impediments in your way?
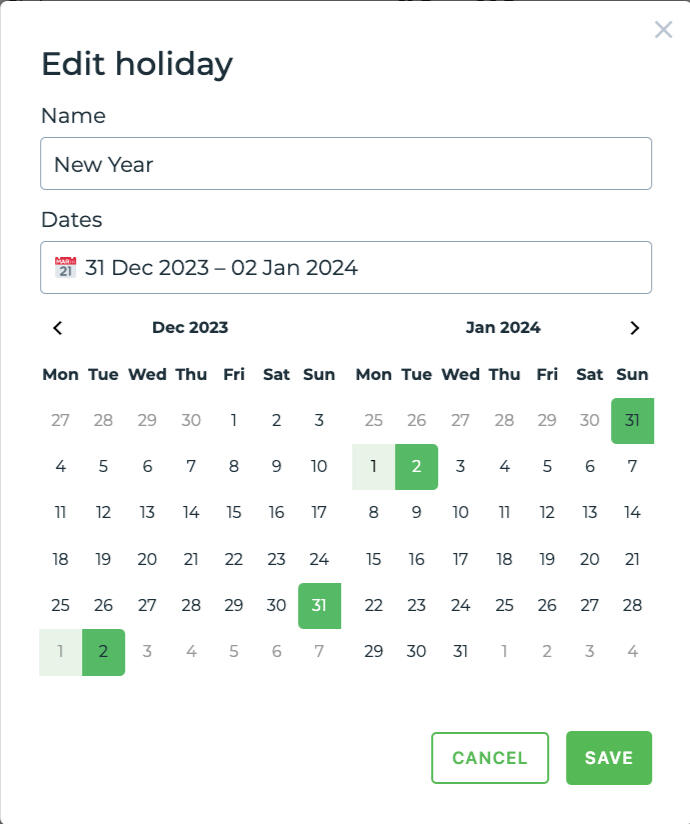
Company holidays
Before users can start requesting leave, administrators need to set up holidays based on your company's policies for tracking purposes. When employees request leave, TimeBot will automatically consider these company holidays to calculate the leave duration.Note: If your team is remote and spread across different countries, consider adding holidays for each country.
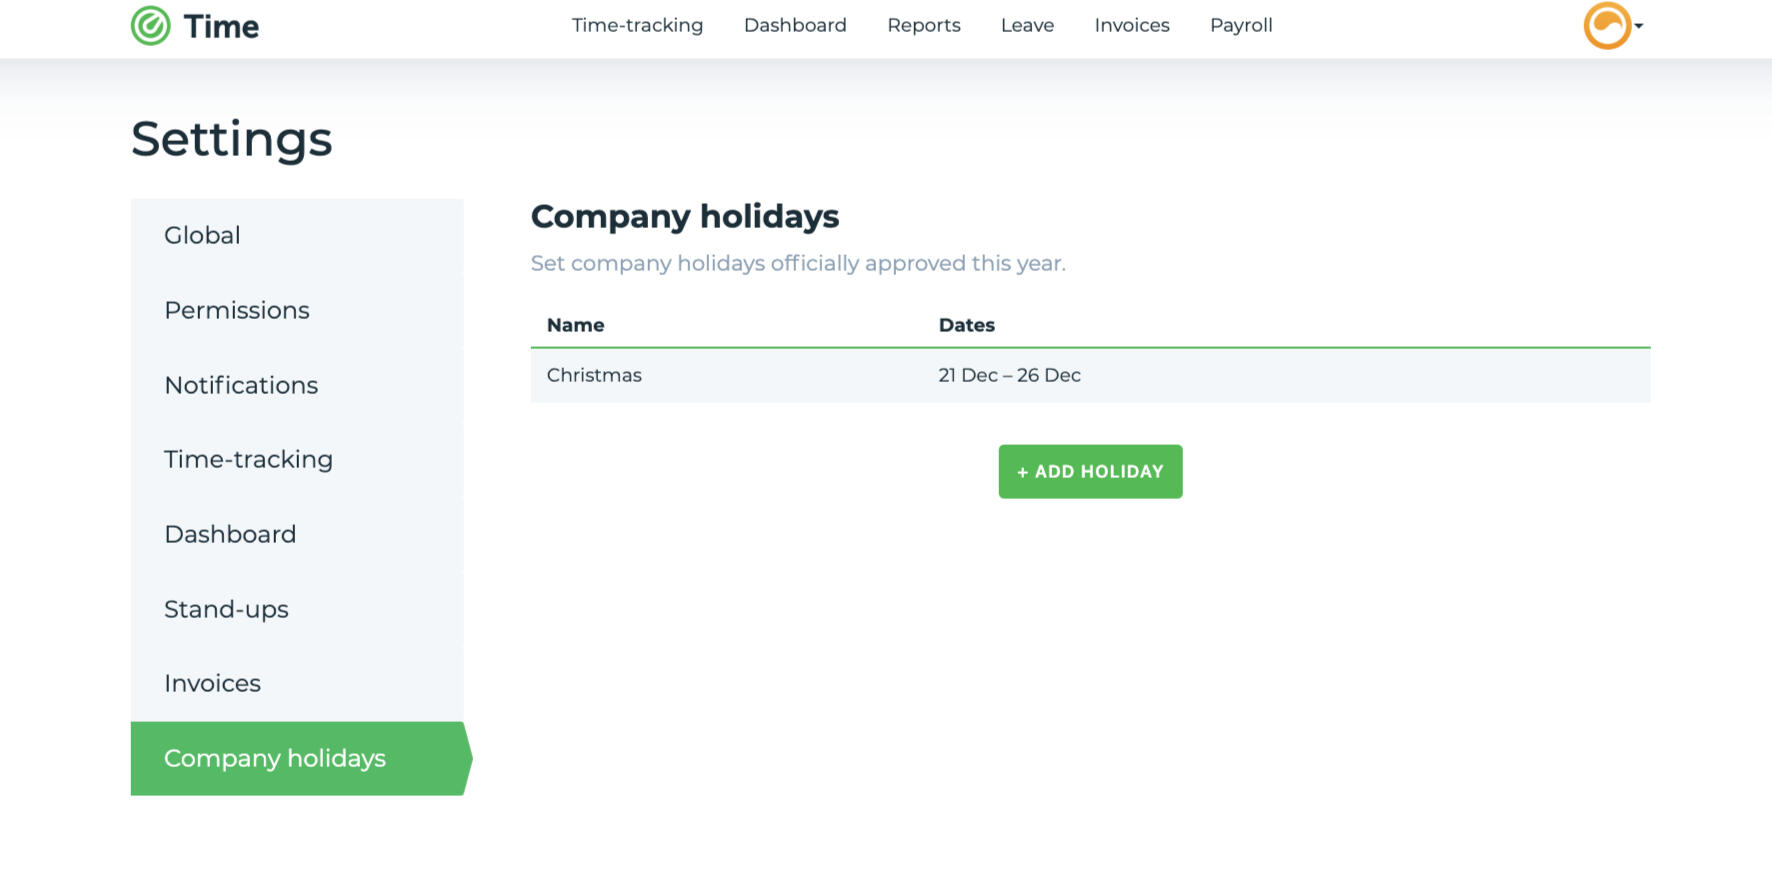
When you click on Add Holiday, you'll be prompted to provide the title and select the duration on the calendar below. Once you add the holiday, it will automatically appear for all users on the calendar under the "Leave" tab, ensuring everyone is aware of the holiday schedule.
Leave
Time Bot streamlines the process of requesting time off through its Leave tab. Employees can easily submit leave requests, and managers can efficiently approve or decline them. Let's explore how the Leave functionality works from both the administrator and user perspectives:
Requesting Leave

1. From the Leave request form choose the type of leave you need (e.g., personal, vacation, sick, parental, etc.).
2. Select the leave start date.
3. Provide a brief note, such as the reason for your leave (if necessary).
4. Click on Request to submit your leave request.

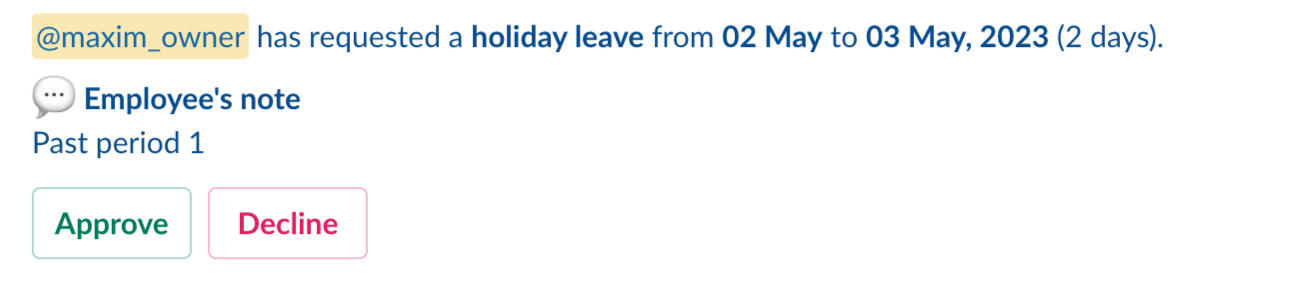
Approving or Declining Leave
As an administrator with the "Leave Management" role, you will receive leave requests from employees for approval. Here's how to handle them:1. Check your Slack notifications for incoming leave requests.
2. Review the details of the leave request, including the start date and reason.
3. Choose whether to approve or decline the leave request.
4. If declining, provide a reason for the decision to facilitate communication with the employee.
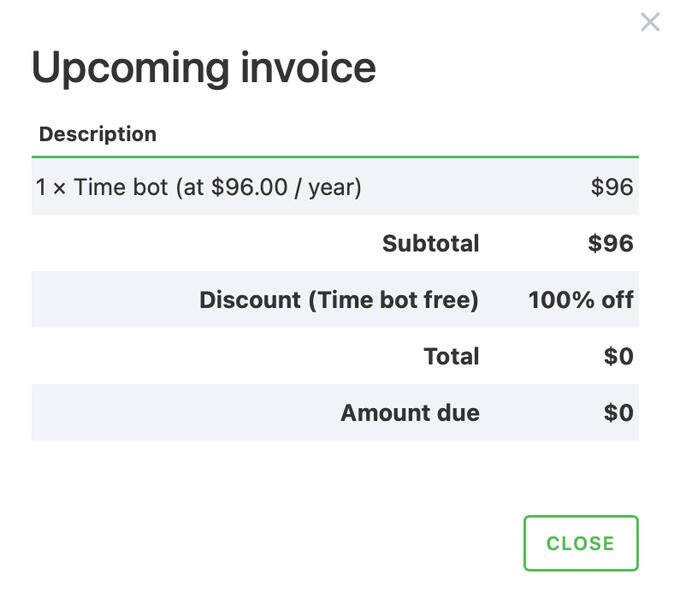
Check your Billing details
To view your Billing details follow the instruction below:
1. Go to the Billing page via the Profile menu.
2. Click on cost and you`ll see the upcoming invoice and the subscription details.
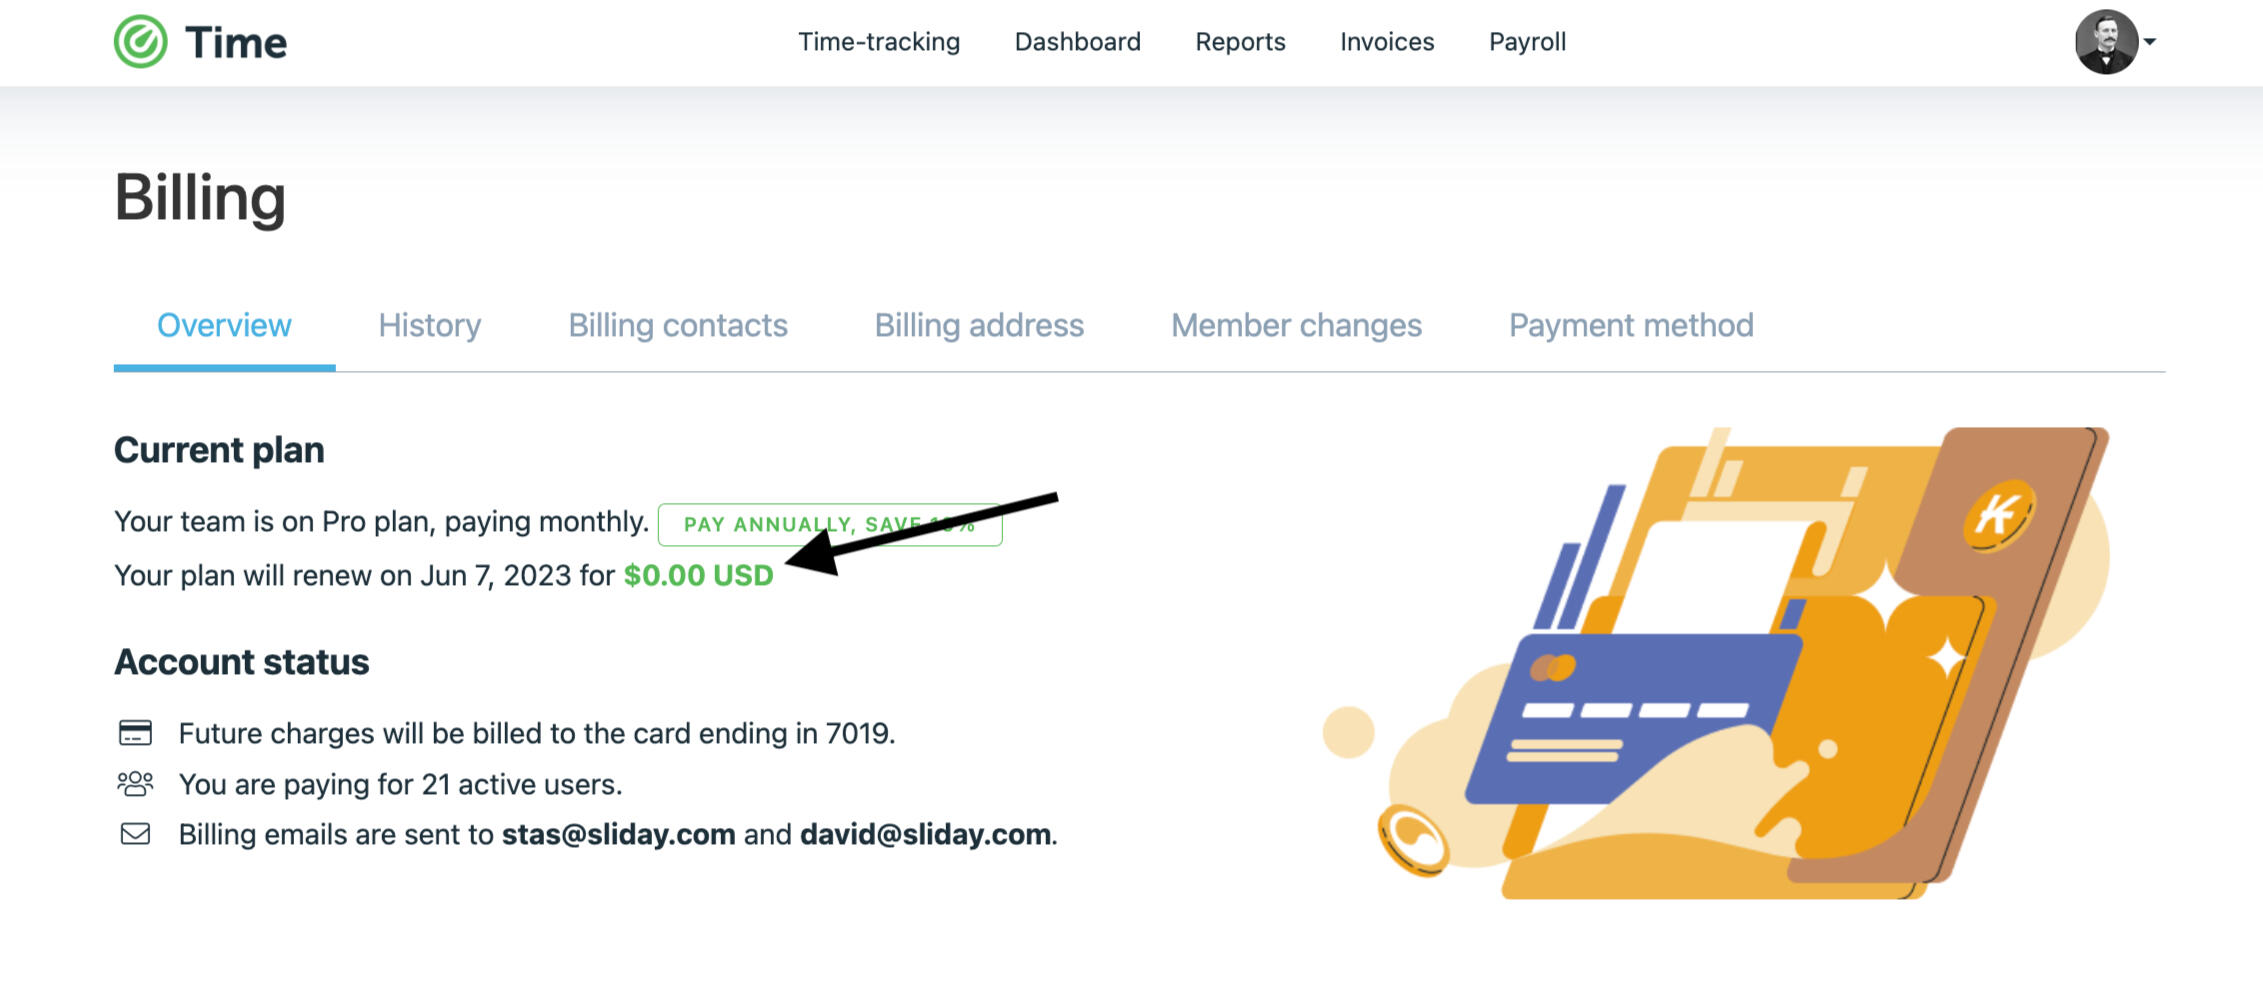
3. You can also change the subscription plan from monthly to annual at any time. All you need to do is to click the Pay annually button.

4. In case you want to pause, reset or delete your account, you can do it in the Danger zone setting section.

Billing and pricing FAQ
What's included in the free trial?
Time bot's 7-day trial is a full feature plan. You can use all of the features available. No credit card required.What's the price for Time bot?Time bot plan is based on the number of members at your Slack's workspace, and it will be $1 per active user per month (minimum charge is for 5 users).** When billed annually.Do you offer discounts for nonprofits?If your team is qualified as a nonprofit on Slack, get in touch for a discount.What methods of payment do you support?All major credit cards accepted: Visa, MasterCard, and American Express. Alternatively, we can invoice you for the subscription amount, please get in touch with us if you wish to pay via telegraphic transfer (t/t).Is my credit card secure?It is safe with Stripe. We don't store credit card details and use trusted and secure Stripe payments system.What happens when the trial is over? Will I be charged?After your trial ends, you won't be charged because we don't require a credit card to try Time bot. However, you'll no longer be able to use Time bot unless you upgrade to a paid plan.Can I get a refund?By default, your election to discontinue will take effect at the end of the then-current subscription period. You will not receive a refund for the then-current subscription period's fees.For example, if you have purchased a full year of Time bot subscription and paid the entire fees in advance, and during the year season you elect to discontinue your subscription, your subscription will expire at the end of the current period, but subscription fees for the current year will not be refunded.As another example, if you have purchased a monthly Time bot subscription and you subsequently elect to discontinue your subscription, your subscription will expire at the end of the current monthly billing period, but subscription fees for the current monthly billing period will not be refunded.All sales are final. We do not give full or partial refunds for subscriptions you have purchased, regardless of the basis for the refund request.As a subscription provider, Time bot reserves the right to offer refunds, discounts or other considerations in select circumstances at its sole discretion.
Or just get in touch
If you have any questions please contact support@timebot.chat
Thank you!
We want to express our sincere gratitude to you and your team. Your assistance has been invaluable to us, and we truly appreciate your efforts. Your support means a lot to us and we are grateful for your willingness to help. Thank you for being a part of our success, and we look forward to continuing our partnership with you!
Changelog
8 January 2024
👍 Added
Added Spanish, Portuguese and Ukrainian localisations for the Landing page.
💎 Improved
Enhanced the clarity and informativeness of billing emails.
🚧 Fixed
Resolved an issue with displaying holidays from future calendar years in the "Home" tab.
25 December 2023
👍 Added
Added YouTube video links (
Video guidebutton) to each settings section.Added an open graph image for the Leave page.
💎 Improved
Added localisations of the notification text in the ticker after making changes on the Roles page.
Added hiding of past holidays on the "Home" tab.
11 December 2023
👍 Added
Implement the Reminder system to notify users of upcoming leave and holidays.
27 November 2023
👍 Added
Added localisations for invoice date values in the exported .pdf file.
Added Ukrainian localisation.
💎 Improved
Improved handling of inputs in invoices on the invoice information page.
13 November 2023
👍 Added
Added a placeholder message 'No upcoming birthdays in 7 days' to the "Home" tab when there is no active leave.
Added smooth calendar refresh when creating a leave request on the Leave page.
🚧 Fixed
Fixed an issue where the 'Total' value displayed incorrectly after deleting records on the invoice information page.
30 October 2023
👍 Added
Enhanced page loading experience by displaying skeleton loaders.
Implemented invoice generation in .pdf format on the invoice information page.
💎 Improved
Using a personalised timezone from Slack.
Improved UI of the Billing page for some localisations.
16 October 2023
👍 Added
Added a block with current leave to the "Home" tab.
Added Spanish and Portuguese localisations.
2 October 2023
👍 Added
Added the
Cancel subscriptionbutton to the "Overview" tab of the billing.Added redirect for the demo account: https://timebot.chat/demo → https://app.timebot.chat
💎 Improved
Improved leave deletion functionality on the Leave page.
18 September 2023
👍 Added
Added the new "Stand-ups" section on the Landing page.
💎 Improved
SEO optimisation.
4 September 2023
👍 Added
Added the Comparison page with competitors.
💎 Improved
Numerous improvements to localisations.
Numerous improvements for leave functionality.
21 August 2023
👍 Added
7 August 2023
👍 Added
🚧 Fixed
Task time editing does not work.
24 July 2023
🚧 Fixed
Fixed the issue where there was no redirection from the /invoices page to the /status page when the invoices_enabled flag was set to false.
10 July 2023
👍 Added
Added possibility to select currency when creating an invoice on the Invoices page.
26 June 2023
👍 Added
Added the option to switch between 12-hour and 24-hour time format in the Global settings section.
5 June 2023
👍 Added
💎 Improved
Improved sorting functionality on the Time report page.
Improved the redirect logic to ensure accurate and consistent navigation within the application.
🚧 Fixed
Fixed the underline effect on the Global label in the settings section when hovering over it.
Fixed the link of the 'Billing contact' field description in the Global settings section, directing to the billing page.
Fixed an issue where users without the necessary permissions were able to access restricted parts of the application through direct links.
15 May 2023
👍 Added
Added Ukrainian localization.
Added the Reports section to the topbar for users to quickly access time-tracking reports.
💎 Improved
Improved the period selection in the "Create invoice" modal window for invoice generation.
Updated the color-coding on the calendar to reflect current information.
🚧 Fixed
In public dashboard mode, the user does not have the Dashboard section in the topbar.
24 April 2023
👍 Added
Added user timezone and local time information to user profile card.
💎 Improved
Improved the security and reliability of the Billing system with new measures and updates.
🚧 Fixed
Fixed incoming invoice message to round the amount to two decimal places.
Fixed an issue with the
/t onlinecommand displaying incorrect information.Fixed an issue where the wrong value for 'endDate' was being passed when filtering on the Time report page, causing inaccurate results.
3 April 2023
💎 Improved
🚧 Fixed
Fixed various bugs and billing issues reported by users.
13 March 2023
👍 Added
Completely redesigned the Billing system.
💎 Improved
Updated calculator and pricing section on the Landing page.
Numerous improvements to localisations.
🚧 Fixed
Various fixes and improvements to the Landing page.
20 February 2023
👍 Added
Improved logic for accessing all users' invoices.
💎 Improved
🚧 Fixed
Addressed several performance issues to improve the overall speed and stability of the system.
30 January 2023
💎 Improved
Added feature to convert minutes to hours for break time.
Improved CSV data export functionality.
🚧 Fixed
Fixed issue with the Time report page showing users with zero hours in project selection.
9 January 2023
💎 Improved
Optimized page loading for the Time report page.
The limit of the forced task completion mechanism has been increased to 24 hours.
🚧 Fixed
Fixed issue with edited messages not updating in the "Broadcast responses to" channel on Time (app).
Fixed issues with tasks spanning multiple days.
Resolved issue with sending empty invoices.
19 December 2022
👍 Added
Added the Invoices settings section.
Implemented logic to allow admins to customize invoicing settings, such as invoice currency and hourly rate.
💎 Improved
A mechanism has been added to delete several lines on the invoice information page.
🚧 Fixed
Fixed issue with timezones causing errors in date and time calculations.
28 November 2022
👍 Added
New advanced table format for exporting data to CSV on the Reports page.
🚧 Fixed
Fixes for the Invoices system.
Displaying the duration of tasks.
7 November 2022
👍 Added
Added "Reject invoice" functionality with reason input.
💎 Improved
Improvements for the Invoices system.
🚧 Fixed
Fixed issue with daily task report emails not being received.
17 October 2022
👍 Added
New component for exporting data to CSV on the Reports page.
💎 Improved
Multiple UI/UX improvements.
26 September 2022
💎 Improved
Many improvements for invoices system.
🚧 Fixed
Fixes for the Invoices system.
5 September 2022
👍 Added
Completely redesigned the Invoices system.
🚧 Fixed
Fixed issue with deleted tasks leaving a marker on the calendar.
15 August 2022
💎 Improved
Improved mobile layout of many screens.
Updated English localizations across the app for improved clarity and consistency.
25 July 2022
👍 Added
New components for selecting channels and searching for them on the Reports page.
🚧 Fixed
Bugfixes and performance improvements.
4 July 2022
👍 Added
Added the new Notifications section for notification settings, allowing users to customize their notification preferences.
💎 Improved
🚧 Fixed
Minor UI fixes.
13 June 2022
👍 Added
Messages from Time if the task was performed in a private channel.
💎 Improved
In the API settings section, the styles of the second-level headers have been changed.
The title of the modal window "Delete invoice title" → "Delete invoice" has been changed.
On the expired subscription page, "Display Name" → "Full Name" has been replaced.
Reduced the number of “Settings saved successfully” messages when entering characters into text fields.
🚧 Fixed
There is no placeholder with zero search results for users.
Incorrect “Settings” header styles.
23 May 2022
👍 Added
Handling long user names in various places.
💎 Improved
The “Beta” marker for "Stand Ups" has been removed.
Already selected channels have been removed from the list on the Reports page.
All inputs and selectors have the same rounded corners.
Improved the operation of the date selector: when selecting a custom period, the ‘Range’ field should be highlighted.
🚧 Fixed
Emails with reports are not coming.
The api-key border has the wrong color.
The border has the wrong color in the “Incoming invoice” modal window on the Billing page.